When he was tasked with updating the famed George Cobb design of The Sea Pines Resort’s Sea Marsh course, legendary golf designer Pete Dye saw a chance to do so much more than simply modernize a course whose age was beginning to show. Having been built in 1963, the original course not only had fallen behind in terms of drainage and advancements in turf, it was originally conceived as a less-challenging alternative to Harbour Town Golf Links or even the Ocean Course (now called Atlantic Dunes by Davis Love III).
Under Dye’s skilled hands, the Sea Marsh course was transformed into Heron Point by Pete Dye and infused with the characteristics that had made his designs legendary. Hazards were made more visually intimidating, each hole was rerouted to give several different avenues to the green, and the Dye philosophy of risk-and-reward was codified in every fairway.
Demanding equal measures, courage, creativity and precision, Heron Point by Pete Dye opened to universal acclaim in 2007, earning it accolades including:
Ranked No. 152 among Golfweek's Best 2023: Top 200 resort courses in the U.S.
Ranked No. 136 among Golfweek’s Best 2022: Top 200 resort courses in the U.S.
Designated as a Certified Audubon Cooperative Sanctuary
Ranked No. 10 in Golfweek’s Best Golf Courses in South Carolina in 2020
Named 2015 “Golf Course of the Year” by the South Carolina Golf Course Owners Association (SCGCOA)
Ranked among GolfAdvisor’s “Best of 2018: South Carolina” courses
Ranked among the top 15 Golfweek’s Best Courses You Can Play, 2018: South Carolina
Nothing Ventured, Nothing Gained
Pete Dye famously viewed golf as a thinking man’s game, with success being less a function of how well you swing and more of how many shots ahead you’re planning. The philosophy is reflected in the courses layout which presents players with a heady risk-versus-reward challenge.
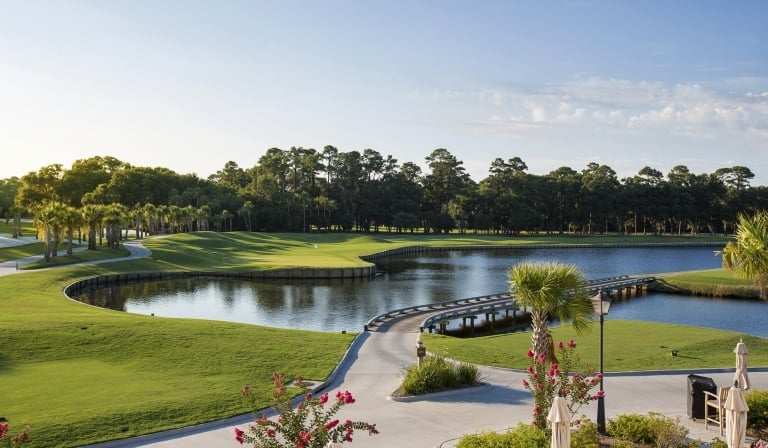
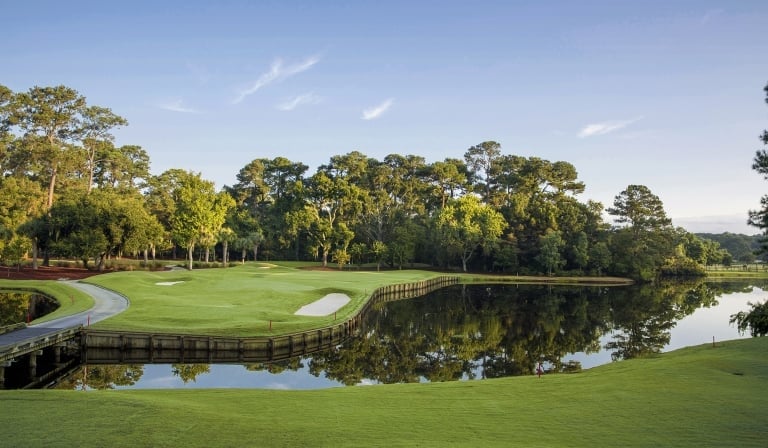
If you’re willing to take on the dangers presented by ruthless fairway bunkers, strategically placed water hazards and greens sculpted for maximum complexity, the rewards are immense. Several of the course’s par fours take this to the next level, forcing a decision between an aggressive route to a birdie or a more conservative line that leaves a harrowing approach shot. And even with that decision made, the greens themselves contour with subtle breaks and carefully guarded entrances that make a two-putt less a foregone conclusion and more a massive accomplishment.
Under Dye’s hand, the lagoons and marshlands that wind throughout the course were weaponized, becoming integral elements to be overcome and requiring skilled club selection. And yet, each still shines with deceptive beauty, lulling you in with their sparkling simplicity.
Challenging, But Playable
The creativity Dye brought to the design of Heron Point gave it a well-earned reputation for its challenge, yet it remains eminently playable for golfers of various skill levels. This is due not only to multiple sets of tees that allow for a more appropriately sized drive, but also because of the way Dye’s design rewards smart course management just as much as it does raw power off the tees. You don’t need to be the best golfer in your foursome to be able to match wits with Dye on your approach shots, letting you succeed on your merits as a shot caller.
It is this balance that makes Heron Point one of the most memorable courses on Hilton Head Island. It rewards the bold just as much as it punishes the reckless. It demands discipline and creativity in equal measure. And perhaps most importantly, it serves as a testament to Pete Dye’s core philosophy that golf is a game of decision-making first and foremost.
Hole-By Hole
In creating Atlantic Dunes, Davis Love III reframed the scenic corridors of the Ocean Course with Lowcountry accents of seaside grass and coquina shells, modernizing its layout for updated shot values.
Hole 1: Par 4, 403 yards from the Dye tees
The first hole offers scenic grandeur, with the risk of bunker and water lining the right edge of the fairway. Place your tee shot in the right-center of the fairway and you’re a mid-iron away from the bunker-guarded green on the right.
Hole 2: Par 4, 312 yards from the Dye tees
The second of three par-fours that start off your round, this hole offers a cerebral challenge that is far more difficult than it appears. Mind your approach shot to the elevated green, as concealed bunkers await errant shots.
Hole 3: Par 4, 370 yards from the Dye tees
The immediate test posed by a trio of par fours to start reaches a crescendo with a drive that demands accuracy against bunkers on the left of this arrow-straight fairway to an elevated green.
Hole 4: Par 3, 239 yards from the Dye tees
Those breathing a sigh of relief after consecutive par fours are in for a rude awakening on one of the most challenging short holes in the Lowcountry. Ever-changing wind conditions and a green flanked by bunkers and water require pin-point precision or plentiful patience.
Hole 5: Par 4, 441 yards from the Dye tees
Now that you’ve worked out your long drive and your shot selection, it’s time to bring those disciplines together on a sharp dogleg right. Dare you bank right toward overhanging trees or shoot left and leave a lengthy approach?
Hole 6: Par 5, 547 yards from the Dye tees
Those with a little more length off of the tees will be able to reach the green in two thanks to a long drive down a fairway lined with ponds and bunkers. Everyone else will have to struggle against a demanding approach shot to a well-guarded green.
Hole 7: Par 3, 179 yards from the Dye tees
This par three may look simple, but its deceptive layout demands precision off the tee. Find the green in one or your short game will be doing battle with a large tree-lined bunker waiting to swallow wayward shots.
Hole 8: Par 4, 420 yards from the Dye tees
Once again, a precise tee shot is mandatory as you try to stop just short of the bunkers along the far side of the fairway. If you have a few more yards off the tees, you can cut the corner and diminish your approach shot considerably.
Hole 9: Par 5, 519 yards from the Dye tees
The final hole of the front nine confronts you with a sharp dogleg to the left that is difficult enough to reach from the tees, much less navigate. Avoid the sand and water on the right of the second shot and you’re an approach shot away from one of the course’s largest greens.
Hole 10: Par 4, 367 yards from the Dye tees
Long hitters may be tempted to show off their drive after a brief respite at the clubhouse, but beware the hazards that line the fairway and demand a straight shot. Approach shots are even trickier to the blind green, but leave opportunities for birdies if well-struck.
Hole 11: Par 5 617 yards from the Dye tees
As it winds through a dogleg left, this hole’s fairway demands a steady hand and precise shot placement. A cross bunker at the dogleg, bunkers along the approach shot and collection patches around the green await all who stray off of center.
Hole 12: Par 4, 413 yards from the Dye tees
A bunker running up the length of the fairway’s right on the initial drive and a bunker complex to the left of a second shot make this slight dogleg a tricky proposition to navigate.
Hole 13: Par 3, 157 yards from the Dye tees
This short hole is one of the most merciful on the course, letting you take in the beauty of the scenery around it. Keep an eye on the wind, know where the pin is placed and avoid shots to the left to stay dry and find par.
Hole 14: Par 4, 414 yards from the Dye tees
You had best either keep it straight or prepare to lose a few balls on this short par four lined entirely by water. Keep to the left and you’re a short iron away from a green well-guarded by bunkers.
Hole 15: Par 4, 470 yards from the Dye tees
Demanding a precise shot just to make par, this slight right dogleg pairs bunkers along the right side with an incredibly narrow and wavy green.
Hole 16: Par 3, 233 yards from the Dye tees
Stick to the left on this challenging par three to avoid bunkers that dot the righthand side of the fairway. An elevated green offers a tricky approach to a potential par.
Hole 17: Par 5, 489 yards from the Dye tees
With this hole, Dye flips the script and tempts you with a high risk shot to cut the corner, penalizing your bravado with an out of bounds area just beyond. Avoid the bunker on the right and you could reach the green in two or at least enjoy a better angle from which to lay up.
Hole 18: Par 4, 436 yards from the Dye tees
Close your round out with one of the most visually stunning holes on the course, but don’t be distracted from the waterside bunkers that dog your drive. Approach the narrow green with caution and the rewards will be great.
Pete Dye is famed the world over for the singular brilliance he brings to his course designs and to the challenges he bakes in to every approach shot. With the gorgeous transformation he stewarded in Heron Point, he has provide perhaps the best example of what sets him apart. And in the process, he added an exciting new dimension to the golf experience not just in Sea Pines, but all over Hilton Head Island.
Thinking About Sea Pines?
As a Hilton Head native and luxury real estate advisor, I can walk you through what's available, what's coming, and whether Sea Pines is the right fit for your goals. Reach out here — no pressure, just honest answers.